XYLEM & PHLOEM
 The purpose of this lab is to continue our study of individual cell types, in
this case Tracheary and Sieve Elements. In later labs we will study more
closely the ways in which these cell types relate to other cells in the same tissues.
The purpose of this lab is to continue our study of individual cell types, in
this case Tracheary and Sieve Elements. In later labs we will study more
closely the ways in which these cell types relate to other cells in the same tissues.
Cells in the primary xylem develop while the organ is still elongating. Thus, they must be sturdy enough to form an uninterrupted conduit for water, and extensible enough to avoid being ruptured. Indeed the initial strands of tracheary elements are ripped to pieces during elongation.
Primary xylem contains tracheary elements, which show a centrifugal sequence of secondary wall patterns. These are annular (hoop-like), helical (spiral), scalariform (ladder-like) and reticulate (net-like). The patterns progress from the center -> outside (Centrifugal), and from the simple to the complex. Furthermore, the relative area of secondary wall also increases progressively. As the area of secondary wall increases it becomes impossible to classify tracheary elements as one of the preceding types.

Treachery Elements in the Primary Xylem
A variety of young stems (stems without secondary growth) will be used to show many of the variations in xylem development. Helical thickenings are the most common and may show various degrees of pitch and coiling.
The extendibility of the helical thickened
tracheary elements is readily demonstrated by making a circular incision in a petiole
or stem of Ricinus (Castor Bean) and then breaking the material in
two. The helical thickenings become exposed and can be extended by pulling.
This is also well demonstrated by Rose Flowered Jatropha.
Suitable material for the study of primary
xylem are Coleus, Castor Bean (Ricinus), Widelia, and geranium stems,
or petioles of celery (Apium) or kukui leaves.
|
|
Protoxylem with Annular Rings & Helical Thickenings (Below) |
|
|
|
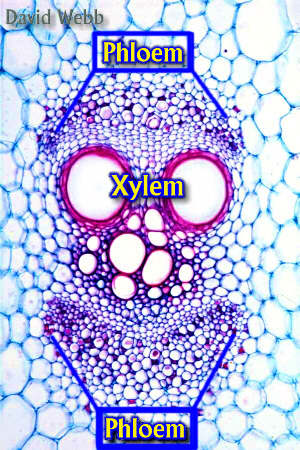
The Xylem and Sclerenchyma should stain Blue-Green while the Phloem stains Pink with Toluidine Blue. The Phloem may be unstained or may become pink.
Xylem and Sclerenchyma stain red-orange with Phloroglucinol while the Phloem is always unstained.
|
|
Vascular Tissues of Coleus Stained with Toluidine Blue: The Fibers and Xylem stained blue due to the presence of Lignin. The Phloem was unstained! |
Vascular
Tissues of Coleus Stained with Phloroglucinol: The Fibers and Xylem stained Red due
to the presence of Lignin. |

Make stem cross sections of Widelia to locate the primary vascular bundles by staining with Toluidine Blue and Phloroglucinol.
Compare
Make longitudinal sections through celery petiole or Coleus
|
|
Coleus Stem Cross Section stained with Phloroglucinol: Note the Vascular Bundles in the corners! |
Coleus Stem Cross Section stained with Phloroglucinol & Viewed with Crossed Polarizers |
Identify the different types of secondary wall thickenings present.

The basic difference between tracheids and vessel members is the presence of a perforation plate on the end walls of vessel members and its absence on tracheids. The perforation plate has openings that are larger than the pits that are present in tracheids. A linear series of vessel members is called a vessel.
The secondary xylem (wood) is highly complex and will be studied in greater detail in later labs. For now it is sufficient to be introduced to the basic difference between
Make or observe free-hand cross sections of Podocarpus which is a Gymnosperm and Coffee (Coffea) which is an Angiosperm.
Examine
Stain
Compare the xylem in Podocarpus and Coffea. Can you see any differences in the size of cell diameters within each? In other words, which is more homogenous in cross section?
|
|
Xylem & Phloem of Podocarpus stained with Phloroglucinol |
Xylem & Phloem of Coffea stained with phloroglucinol & viewed with crossed polarizers. |
Observe prepared slides of Pinus wood and find the bordered pit pairs of the tracheids in cross & radial sections. The torus is more darkly stained and fairly easy to spot.
View macerated Pinewood and note the relative uniformity of the cells which are all Tracheids. Perforation plates are NOT present on the end-walls of the Tracheids. However, large pits may be clustered where tracheids overlap.
|
|
|
Radial section of Pinewood viewed with crossed polarizers. |
Bordered Pits in Pine Tracheids |
Macerated Pine Wood |
For
Use longitudinal sections to see the numerous bordered pits on the sidewalls of the vessels. These have simple perforation plates.
|
|
Tilia Xylem Cross Section |
Vessel Member from Oak (Quercus) |
Observe Liquidambar demonstration of more complex
Look also for
Highly magnified picture of a Vessel, viewed with Polarized Light: The absence of transverse end-walls makes this a Vessel Member with a |
|

Study prepared slides of cross and longitudinal sections of Cucurbita stems.
Locate the xylem and phloem. Does the phloem occur on one side of the xylem (collateral bundle) or on both sides (bicollateral)????
Prepare a hand section and stain with Toluidine Blue. Compare this with the commercial slide.
|
|
Cucumber Vascular Bundle: It has Phloem on two sides of the Xylem |
Cucumber Vascular Bundle showing the Phloem. The dark cells are Companion Cells & the largest cells are Sieve Tube Members. |
High-power study shows the three components of the phloem tissue: Sieve Elements (here Sieve Tube Members), Companion Cells (small cells accompanying the sieve elements), and Phloem Parenchyma cells (intermediate in size between sieve elements and companion cells). The end walls of the sieve elements seen from the surface in cross sections, bear highly differentiated Sieve Areas.
 These end walls are called Sieve
Plates. The protoplasts of adjacent sieve tube members form a continuum
through the sieve plates.
These connections are
the Connecting Strands. Each is encased in Callose, a carbohydrate
wall substance chemically distinct from the cellulose that lines the sieve pores.
These end walls are called Sieve
Plates. The protoplasts of adjacent sieve tube members form a continuum
through the sieve plates.
These connections are
the Connecting Strands. Each is encased in Callose, a carbohydrate
wall substance chemically distinct from the cellulose that lines the sieve pores.
Staining shows that sieve elements appear end to end in longitudinal series and thus, form Sieve Tubes.
The lateral walls of sieve tubes bear relatively undifferentiated Sieve Areas. The pores in the sieve areas are much larger than typical pits and resemble those in the sieve plate.
|
|
Top view of a Sieve Plate from a commercial slide at high magnification |
Commercial slide of Phloem seen in Longitudinal section: Note the Red-Stained material which contains Callose. also note the Sieve Plates |
In order to demonstrate
Aniline
Blue preferentially
stains callose.
Furthermore, stained callose emits fluorescence under ultra-violet and violet light.
Staining Procedure
It is sufficient to
stain the sections with Aniline Blue, wait 5 min.,
rinse with water and observe.
I am including a more detailed protocol for your reference.
Detailed protocol for Aniline Blue Staining
Place sections in IKI for 3 minutes,
Rinse with water
Stain 5 minutes with 0.1% aqueous aniline blue.
Wash briefly with IKI
Mount in water.

Look for concentrations of the stain in the phloem region, and locate the presence of sieve plates in the highly stained areas.
Callose accumulates at the Sieve Plates due to the pressure that exists in the Phloem.
Observe these sections with a fluorescence microscope that clearly shows the sieve plates because of aniline blue fluorescence. These will appear white or light blue against a dark background. Plastids will fluoresce red. Xylem fluorescence will also be blue but you can easily identify it due to the characteristic secondary wall thickenings.
|
| Overall view of a longitudinal section of cucumber stem stained with Aniline Blue and seen with Violet Fluorescence. The cell walls of the Xylem are auto fluorescent while the fluorescence of the Phloem is due to Callose which has stained with Aniline Blue |
The sieve plates will be the most fluorescent areas because callose accumulates there normally and becomes more concentrated after wounding.
The sieve plates vary in their orientation. Some are perpendicular to the long axis of the stem while others may have 45O angles of inclination. The latter can be seen in face view in longitudinal sections.
This allows you to see the sieve pores.