|
|
| C O N T E N T S |
| C-Fern Home |
| Web Manual |
| Introduction C-Fern Nutrient Medium Culture Conditions Gametophyte Culture Gametophyte Observations Sporophyte Culture Spore Mutagenesis Bibliography |
|
Light Stand Growth Pod DNA Extraction C-Fern T-shirt Who's Who Selection and mutants Media formulation error Image gallery |
| Web Journal |
| Educational Resources |
|
National Science Standards Gametophyte development Student research questions Research in the classroom Research with C-Fern Brief description of C-Fern C-Fern manipulation Root tropism? |
| Frequently Asked Questions |
| Workshop and Exhibit Schedule |
| Investigations Mutant & wild type spores Manual & Culture Instructions Supplies - Domes, media |
 |
| Development
of C-Fern is supported by the National Science Foundation (NSF-DUE) |
|
Copyright
© 1997-2000
Thomas R. Warne and Leslie G. Hickok. All rights reserved. |
| Teaching
With C-Fern
Gametophyte Development and Sexual Reproduction in C-Fern
MATERIALS
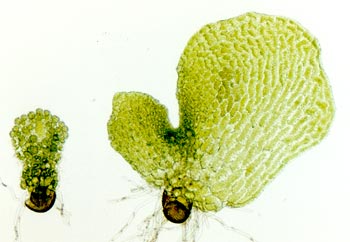
For this exercise, students sow spores and culture gametophytes in 60x15 mm plastic petri dishes containing an agar solidified nutrient medium. (Composition of stock solutions and working nutrient medium (Basic C-Fern Nutrient Medium) are given in the C-Fern Web Manual.) This investigation is a multi-week laboratory activity that involves direct observation of critical developmental events, data collection and synthesis. Since establishment of cultures and subsequent manipulations and observations are not time-consuming, other botanical or developmental topics can be integrated into these laboratory sessions. In the first week, students recieve written materials that provide goals for this investigation, sufficient background on the plant life cycle and specifc step-by-step intructions for compleletingthis investigations. For the following weeks, students are prompted to make observations through questions. LABORATORY EXERCISE WEEK 1 Goal: To observe development of the gametophytic generation of a fern (Ceratopteris, C-Fern). You will make observations on spore germination, gametophyte ontogeny,sexual maturation, fertilization, embryo growth and the development of the young sporophyte. You should be able to relate all of these events to the complete life cycle of a fern as well as to plants in general. Background: The life cycle of land plants is characterized by an alternation between two phases or generations that are morphologically and functionally distinct. The gametophyte generation is the sexual phase of the life cycle. Gametophytes produce eggs and/or sperm (gametes) and house and nourish the product of fertilization, the embryo. Gametophytes may be extremely small (seed plants) or the dominant phase of the life cycle (bryophytes). Although fern gametophytes are quite small, they are free-living and independent from the much larger spore-producing plant that you are familiar with, i.e. the sporophyte. In ferns, seed plants and other vascular plants, the sporophyte is the dominant phase of the life cycle and produces spores by meiosis. Spores are haploid cells and the plant that produces spores, the sporophyte, must be diploid. This contrasts from most animals, in which meiosis yields gametes. After spores are dispersed from the sporophyte and germinate, what do they grow into? You will answer this question (if you do not already know the answer!) by observations of developing fern spores. You will inoculate C-Fern spores onto nutrient medium and use your sharpest powers of observation to see how fern spores develop. To do this investigation you will need: C-Fern spores, one cotton-tipped swab, one Petri dish containing agar-solidified nutrient medium, one plastic sanwich bag a marker and a place to grow your culture A spore is a single cell. Under the right conditions, spores grow by mitotic divisions and differentiate into multicellular plants that eventually produce gametes. Look at the vial of C-Fern spores. These are spores of a tropical fern called Ceratopteris. you may have seen this fern sold as an aquarium plant named water sprite. How many spores do you think are in the vial? Are the spores dry? If they are dry, how can they survive? What do you think would be necessary for them to germinate? Take a cotton-tipped swab and carefully dip it into the spores so that some spore adhere to the cotton. Take only a few spores! Since spores are very small, only a slight brown coloration on the cotton end is plenty. Tilt the Petri dish lid only enough to position the swab tip over the agar and tap off some of the spores onto the agar surface. After distributing the spores as sparsely and as evenly as possible, replace the petri dish lid. It is important to work quickly while the lid is up so that you reduce the chance that foreign air-borne spores and other contaminates enter your culture.Using the marker, write your initials and date on the lid and bottom of the Petrid dish. Place your dish into a plastic sandwich bag. Prepare a wet mount of some of spores remaining on the swab. Sprinkle some spores into a small drop of water on a microscope slide and place a cover slip over them. Observe this wet mount of spores under the microscope at different powers. Can you see any patterns on the spore walls? What variations in the spore wall ornamentation occur on different surfaces of the spores? Draw a few spores showing the wall pattern or ornamentation. Observe the spores on your dish with the microscope. Describe and record the general size and color and distribution of sporeson the dish. Over the next several laboratory session, it will be your job to carefully observe these spores and what happens to them. When you arrive for your lab period the first thing that you should do is check your fern cultures - it will only take a few miutes! Make good notes and drawings of what you see. You will be given additional instructions and questions to aid in your observations. WEEK 2 Have you observed the fern cultures that you inoculated last week?. By this time many spores should be germinated. Can you see anything without a microscope? Observe the size, color and distribution of germinated spores through the lid of the dish with the dissecting microscope and compare and contrast the appearance of your spores with the observations you made last week. You can identify the developing ferns because they will always be growing out of spores. What is happening when spores germinate? Have all the spores germinated? What could be the reasons for germination of some spores and not others? Are there fungal, bacterial or algal contaminants on the plate? Where do these contaminants come from? Carefully lift the lid of the culture and remove a few of the germinated spores using a probe. Prepare a wet mount of the germinated spores and observe them under the microscope. Locate the original spore walls. What has happened to the spore wall? The minute plants poking out of the spore wall should be green. Locate the rhizoids. What is the function of rhizoids in a plant that is composed of only a few cells? Locate cells that contain chloroplasts. Draw several of these young plants and label the spore wall, rhizoids and photosynthetic cells with chloroplasts. What differences are there, if any, among the young plants that you observed? Replace your dish into the sandwich bag and put it back in the culture area. WEEK 3 As in the last laboratory, you should start by observing your fern cultures. As before, observe the fern plants on the dish and record your observations. Can you see anything without a microscope? Identify the two morphologically distinct kinds of gametophytes (prothallia, sing. prothallus). The larger mitten-shaped gametophytes produce both male and female sex organs. The male sex organs (antheridia, sing. antheridium) are found around the margins of the plant and near the rhizoids at the lower part of the plant. The female sex organs (archegonia, sing. archegonium) are aggregated near the growing notch, usually on the underside of the plant. Among these larger gametophytes should be numerous small, exclusively male plants. Each male gametophyte consists of numerous antheridia that give a bumpy appearance to the plant. These males develop in response to the presence of a special chemical (antheridiogen) in the medium that is secreted by older gametophytes. Can you think of any ecological or genetic advantages for such a condition in nature? Make a wet mount that includes a few gametophytes of both types and observe your slide under the compound microscope. Draw one of each type of gametophyte, include and label the spore wall, rhizoids, photosynthetic cells, sex organs,and growing notch. What is different about these two types of gametophytes? How have the gametophytes changed from last week? In addition, this week you should see the male gametes or spermatozoids in action. Prepare a new wet mount of several of the older male gametophytes so that you can carefully observe their antheridia, include one or two of the larger mitten-shaped gametophytes that have one to three archegonia. Over the next 5 minutes continually observe the antheridia with the compound microscope. What happens to antheridia? What does water do? Where do sperm cells come from? When you see movement, increase the magnification and observe these small, flagellated gametes. Be very patient - give it some time. The sperm cells can move very quickly and are hard to examine unless they are caught on something or slow down. Draw and describe the shape of the sperm cells and try to locate flagella. Once you have observed swimming sperm cells, locate the archegonia on another gametophyte. If you are patient and lucky, you will see the sperm cells swimming down the neck of the archegonium on its way to fertilize the egg inside. How can the sperm cells find their way to the egg cell? How long and how far can one sperm cell swim? Before you put your dish back into its plastic bag, sprinkle the plants with distilled water from the squirt bottles. This water will allow the sperm cells to easily swim to the eggs in the archegonia. Next week, take a look at your cultures to see if the next generation, the diploid sporophyte, has begun to develop. The sporophyte is the product of fertilization and develops from the zygote inside of the archegonium. By next week, the sporophyte will be very small but it should be visible. WEEK 4 As in the beginning of the last laboratory, you should continue observing your fern gametophyte cultures. Gently remove a few of the mitten-shaped gametophytes from the dish and prepare a wet mount. Carefully observe the region close to the growing notch. If fertilization was successful last week, you may be able to see bumps at the base of older archegonia! What do you think these bumps will grow into? Where have these bumps come from? By next week, the young sporophytes should be easily visible. Some sporophytes may be large enough to transplant from the petri dish to a terrarium containing potting soil. A 2 liter clear plastic beverage bottle can make a small, cheap miniterrarium. When you transfer the young sporophytes, try not to take a lot of agar and separate out individual plants. If you watch your fern grow long enough (30 or more days) you may be able to find sporangia that will develop on the backside of specialized leaves. At that point, you may wish to grow spores and begin another cycle of the life history of Ceratopteris
|